
🛒 Best Price Today on Amazon
Prime members get fast, free shipping on everything above, plus member-only deals. New members get a 30-day free trial — cancel anytime.
Low generator voltage can make lights flicker, motors overheat, chargers stop working, or sensitive electronics shut down. A reading that is only slightly low may point to an overloaded circuit or a poor connection; a major drop can indicate a failed automatic voltage regulator (AVR), damaged brushes, weak excitation, or an engine running below its rated speed. Troubleshooting in the wrong order can expose you to lethal voltage, damage appliances, or cause a portable generator to produce unstable power. This 2026 guide starts with safe, simple checks and explains when testing should stop.
What You Need
| Item | Why | Optional? |
|---|---|---|
| True-RMS digital multimeter rated CAT III 600 V or better | Measures AC voltage, frequency on some models, continuity, and DC output. Use leads in good condition. | No |
| Clamp meter | Measures running current without disconnecting wires, helping identify overloads. | Yes |
| Owner’s manual and wiring diagram | Provides the correct voltage, frequency, breaker rating, and AVR or brush-access procedure for your model. | No |
| Insulated screwdriver, nut drivers, and flashlight | Useful for visual inspection and tightening de-energized terminals. | No |
| Noncontact voltage tester | Provides an additional check that a circuit may be energized, but it does not replace a meter. | Yes |
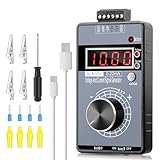
| Riiai 0–10V/0–4–20mA signal generator with 4-digit display, about $30 | Can help a qualified technician test compatible control inputs. It is not a substitute for an AC voltmeter and does not safely test generator output by itself. | Yes |
| Replacement fuse, AVR, or brush set specified for your generator | May be needed after the fault is identified. Match the exact part number and rating. | Yes |
Do not use a high-voltage arc igniter or inverter module as a generator troubleshooting tool. Products such as the AEDIKO 15KV generator sets, sold in packs around $10, can create dangerous high-voltage arcs and are not suitable substitutes for generator parts or test equipment.
As an Amazon Associate we earn from qualifying purchases at no extra cost to you.

Step-by-Step
1. Shut down safely and identify the correct rating (10 minutes)
Move the generator outdoors, at least 20 feet from doors, windows, and vents, and keep it away from rain or standing water. Carbon monoxide can build up quickly even when the engine appears to run normally. Turn off connected loads, open the generator’s main breaker if it has one, and let the engine cool before removing covers.
Read the nameplate and manual. Note whether the unit is rated for 120 V, 120/240 V, or another output, and whether it should produce 60 Hz. Many household portable generators are designed to hold roughly 120 V and 60 Hz with no load, but the allowable range varies by model. Never assume a 240-V receptacle supplies 240 V unless the manual confirms it.
2. Confirm that the low reading is real (5–10 minutes)
Set the multimeter to AC volts, use the correct voltage jack, and keep your fingers behind the probe guards. Start the generator with nothing plugged in. Measure at the generator receptacle: place one probe on the hot slot and the other on neutral for a 120-V outlet. For a 240-V outlet, measure hot-to-hot only if the outlet and generator are designed for that test.
Compare the reading with the nameplate specification. Test a second outlet if available. If one receptacle is normal and another is low, suspect a breaker, receptacle, transfer switch, or wiring issue rather than the alternator. If the voltage is low everywhere, continue with the next checks. Stop immediately if the meter shows a rapidly changing, unusually high, or zero reading while the engine sounds normal.
3. Check frequency and engine speed (5–10 minutes)
Low engine speed commonly causes low voltage and low frequency. If your meter has a frequency function, check the output with no load and again with a modest load. A conventional 60-Hz generator generally needs to remain close to 60 Hz; a reading around 50 Hz on a 60-Hz unit indicates a serious speed or control problem. Inverter generators may display different behavior, so follow the manual.
Listen for hunting, surging, misfiring, or an engine that bogs down. Check the air filter, fuel level, fuel valve, stale gasoline, and oil-level shutdown indicator. Do not adjust the governor spring or throttle stop casually. Incorrect adjustment can create overspeed, which can destroy the generator and connected equipment.
4. Remove the load and add it back gradually (10 minutes)
Unplug every appliance, reset the generator breaker, and record the no-load voltage. Then connect one known load at a time. A 1,000-watt heater is easier to evaluate than a refrigerator because motors have high starting demand. Add loads while watching voltage, frequency, and engine sound.
Estimate demand in watts from each appliance label. A 1,500-W space heater consumes about 1,500 W, while a refrigerator labeled 700 W running may briefly require substantially more to start. Keep continuous load below the generator’s rated running wattage; many manufacturers recommend staying near 80% for sustained use. If voltage falls only when the total load rises, reduce the load or investigate a failing engine, breaker, or alternator.
5. Inspect cords, plugs, breakers, and terminals (15–20 minutes)
Shut down the generator, disconnect the battery if the manual requires it, and verify that no circuit is energized. Look for melted plastic, darkened terminals, loose screws, corrosion, bent receptacle contacts, and undersized extension cords. A long, light-duty cord can cause a substantial voltage drop, especially with high-wattage tools.
Use a heavy-duty outdoor cord sized for the current and length. As a general example, a 12-gauge cord is often appropriate for up to 15 amps over moderate distances, while longer runs or higher currents may require 10-gauge conductors. Follow the cord and generator manufacturer’s limits. Replace damaged cords rather than taping over burns or exposed copper.
6. Inspect brushes, slip rings, and the AVR only if qualified (20–45 minutes)
Brush-type generators use carbon brushes to transfer excitation current to the rotor. Worn, stuck, oil-contaminated, or broken brushes can produce low or intermittent voltage. With the unit completely off, inspect only as described in the manual. Some brushes are accessible behind a small cover; others require removing the end bell.
The AVR controls excitation and is a common failure point, but it can be damaged by incorrect wiring or testing. Photograph every connection before removal, match the exact part number, and never substitute an AVR based only on physical appearance. Do not touch energized internal components. If the manual calls for resistance, diode, or field-voltage tests, use the specified meter range and procedures. Otherwise, have a generator technician perform them.
7. Test again and document the result (5–10 minutes)
After correcting an obvious issue, run the generator with no load and then with a known load. Record voltage, frequency, load size, and whether the engine surges. A stable reading at the receptacle with normal frequency points away from the generator itself and toward the appliance, extension cord, transfer equipment, or house wiring.
Mistakes to Avoid
- Do not operate a gasoline or propane generator indoors, in a garage, or near an open window.
- Do not backfeed a home through a wall outlet. Use a properly installed transfer switch and a qualified electrician.
- Do not connect electronics while the generator is surging or producing unexplained voltage.
- Do not measure resistance, continuity, or current with the meter across a live AC outlet unless the meter and procedure specifically support it.
- Do not bypass breakers, fuses, low-oil shutdowns, or neutral-ground protections.
- Do not adjust the governor to “raise voltage” before checking frequency and the manufacturer’s procedure.
- Do not install a generic AVR, capacitor, brush, or ignition module without confirming compatibility.
How Often
Test-run a standby generator monthly for about 15–20 minutes, following the manufacturer’s load recommendation. Portable units should be checked before every major use and after storage. Inspect cords, fuel lines, air filters, oil level, battery terminals, and receptacles at least annually. Change oil and service the air filter according to the manual; heavy dust, frequent high loads, and long storage may require shorter intervals. Record voltage and frequency during routine tests so a gradual change is easier to spot.
When to Call a Pro or Replace
Call a qualified generator technician when low voltage remains with no load, frequency is unstable, internal covers must be removed, the unit has experienced a short circuit or water intrusion, or you smell burning insulation. Professional diagnosis is also appropriate for standby systems, transfer switches, 240-V circuits, and any generator connected to household wiring.
Replacement may make more sense when the alternator, engine, and control board all need work; parts and labor approach the cost of a comparable new unit; the frame or fuel system is corroded; or the generator repeatedly trips protection devices. Never keep using a unit that overheats, arcs, produces smoke, or delivers erratic voltage.
FAQ
Can a low battery cause low generator voltage?
On some electric-start or inverter models, a weak battery can prevent proper startup or affect controls, but it is not the usual cause of low AC output after the engine is running. Check the battery and charging system according to the manual, while also testing engine speed and receptacle voltage.
Will adding a capacitor fix low voltage?
Only generators designed to use a capacitor should receive one, and it must have the exact capacitance and voltage rating specified. Adding a capacitor as a guess can damage the winding or create an unsafe overvoltage condition.
Why is voltage low only when a tool starts?
Motors draw a high starting current. The generator may be undersized, the tool may have a failing motor, or a long extension cord may be causing excessive drop. Test with the tool disconnected, then use a shorter, properly sized cord and compare the tool’s starting-watt requirement with the generator’s specifications.
Is 110 V too low for a 120-V generator?
A brief dip during motor startup may be normal, but a steady 110 V reading under light load is below the nominal 120 V and deserves investigation. Confirm the reading with a reliable meter, check frequency, and consult the generator manual before connecting sensitive equipment.


Write Your Review
No reviews yet. Be the first to share your experience!