
🛒 Best Price Today on Amazon
Prime members get fast, free shipping on everything above, plus member-only deals. New members get a 30-day free trial — cancel anytime.
A worn or fouled spark plug can make a portable generator hard to start, cause rough running, reduce power, or increase fuel use. Replacing it is usually a straightforward maintenance job, but small mistakes can create bigger problems. Installing the wrong plug, cross-threading it, overtightening it, or reconnecting the plug wire incorrectly may damage the cylinder head or leave the generator unable to run.
This guide explains how to replace generator spark plug safely in 2026. Always check your generator’s owner’s manual for the exact plug number, gap specification, and tightening torque before buying parts or turning a wrench.
As an Amazon Associate we earn from qualifying purchases at no extra cost to you.

What You Need
| Item | Why | Optional? |
|---|---|---|
| Correct replacement spark plug | The plug must match your generator’s engine, heat range, thread size, reach, and electrode gap. Common small-engine plugs cost about $4 to $15 each. | No |
| Spark plug socket | Removes and installs the plug without damaging the ceramic insulator. Common sizes include 5/8 inch and 13/16 inch, but verify yours. | No |
| Ratchet and short extension | Provides access in recessed or crowded engine compartments. | No, if the plug is accessible by hand or with a socket alone |
| Gap gauge | Checks the distance between the center and ground electrodes before installation. | Recommended |
| Torque wrench | Helps prevent loose installation or damaged threads from overtightening. | Recommended |
| Compressed air or a soft brush | Clears dirt from around the plug before removal so debris does not fall into the cylinder. | Yes |
| Work gloves and safety glasses | Protects your hands and eyes from sharp panels, dirt, and loose particles. | Recommended |
| Replacement plug wire boot or dielectric grease | Useful if the boot is cracked or moisture protection is needed. Use grease sparingly inside the boot, not on the electrode or threads. | Yes |
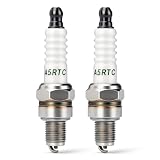
Two reference products illustrate the usual price range: a two-pack of CR5HSB-compatible Torch A5RTC plugs is listed for under $10, while a two-pack of genuine OEM #98056-55777 plugs for certain Honda EU2000i and EU2200-series generators is listed for under $20. Compatibility matters more than brand or price, so do not assume either product fits your generator.
Step-by-Step
1. Shut down and cool the generator (10 to 20 minutes)
Turn the generator off and let the engine cool completely. A hot cylinder head can burn you and may make the plug threads easier to damage. Move the generator outdoors or to a well-ventilated location, away from flames, pilot lights, cigarettes, and other ignition sources.
Disconnect every appliance from the outlets. If the model has a fuel valve, turn it off. For extra protection, disconnect the negative battery cable on models equipped with an electric starter, following the owner’s manual. Never service a generator while it is running, and never operate it in a garage, shed, basement, or other enclosed space because carbon monoxide can build up rapidly.
2. Locate and expose the spark plug (2 to 5 minutes)
Find the thick ignition wire leading to the spark plug. On many portable generators, the plug is under a small access panel, rubber cover, or removable engine shroud. Remove only the panels necessary to reach it, keeping screws in a cup or labeled container.
Before disconnecting anything, take a quick photo of the wire routing. Do not pull on the wire itself. Grip the rubber boot and twist it gently while pulling straight away from the plug.
3. Clean around the plug (1 to 2 minutes)
Brush away loose dirt, grass, and dust from the plug recess. If you have compressed air, use short bursts while wearing eye protection and keep the air nozzle several inches away. Cleaning first is important: debris that falls into the open spark plug hole can enter the cylinder and cause damage.
4. Remove the old spark plug (3 to 5 minutes)
Fit the correct spark plug socket fully over the plug. Add a short extension if needed, then turn the ratchet counterclockwise. If the plug is difficult to loosen, apply steady pressure rather than jerking the ratchet. Do not use excessive force on an aluminum cylinder head.
Once loose, remove the plug by hand or with the socket. Examine the old plug. A light tan or gray deposit is generally normal, while heavy black carbon, wet fuel, oil fouling, a melted electrode, or a cracked insulator can point to additional engine or fuel-system problems.
5. Check the replacement plug (3 to 5 minutes)
Compare the new plug with the old one and verify the part number against the manual. Check the thread diameter, reach, terminal style, and sealing washer. Even plugs that look nearly identical may have different heat ranges or thread lengths.
Use a gap gauge to measure the electrode gap. Set it to the specification printed in the manual, often measured in thousandths of an inch. Adjust only as the plug manufacturer permits: bend the ground electrode carefully, and never pry against the center electrode or porcelain. Many new plugs are pre-gapped, but “pre-gapped” does not guarantee the setting is correct for your generator.
6. Install the new plug by hand (2 to 4 minutes)
Place the plug into the socket and carefully lower it into the threaded hole. Turn it clockwise by hand for several complete turns. If it will not start smoothly, remove it and try again. Cross-threading can permanently damage the cylinder head, especially when the head is aluminum.
Do not apply anti-seize unless the generator manufacturer specifically recommends it. Anti-seize can change the friction on the threads and cause over-tightening. Keep oil, grease, and dirt off the electrode and ceramic insulator.
7. Tighten to specification (1 to 3 minutes)
Use a torque wrench if the manual provides a torque value. Spark plug torque varies by plug size, gasket type, and engine design, so do not copy a number from another generator. If no torque wrench is available, follow the plug maker’s instructions for a new gasketed plug, but use a torque wrench whenever possible.
Stop if the plug suddenly becomes difficult to turn before it is seated. Remove it and inspect the threads for dirt or damage. Overtightening can strip the head, crush the sealing washer, or break the plug’s ceramic body.
8. Reconnect the boot and test the generator (5 to 10 minutes)
Push the ignition boot firmly onto the new plug until it seats securely. You may feel or hear a small click as the terminal engages. Inspect the wire for cracks, burns, or loose connections, then reinstall any access panels.
Reconnect the battery cable if you removed it. Start the generator according to the manual and let it idle for several minutes. Listen for smooth operation and check for misfires, unusual ticking, fuel leaks, or warning lights. Connect a modest load only after the engine runs normally, then test the outlets with an appliance well below the generator’s rated running wattage.
Mistakes to Avoid
- Choosing by appearance: Match the exact plug number and engine specification, not just the socket size.
- Working while hot or running: A hot engine and exposed ignition system create burn, shock, and fire hazards.
- Skipping the cleaning step: Dirt can fall into the cylinder when the old plug is removed.
- Cross-threading: Always start the replacement plug by hand before using a ratchet.
- Over-tightening: Use the manufacturer’s torque specification; more force is not better.
- Forcing the gap: Do not bend the center electrode or strike the porcelain.
- Pulling the wire: Remove the ignition boot by its rubber body, not the cable.
- Testing indoors: Carbon monoxide from a generator can be fatal, even near an open door or window.
How Often
Replacement intervals depend on the engine and operating conditions. Many portable generators call for spark plug inspection every 50 to 100 operating hours and replacement about every 100 to 300 hours, or once a year for occasional-use equipment. A generator used in dusty conditions, under heavy loads, or for long continuous periods may need more frequent inspection.
Inspect the plug before long outages and after extended storage. Replace it sooner if the electrode is worn, the porcelain is cracked, the plug is heavily fouled, or the generator becomes difficult to start. Keep a spare correct plug with your emergency supplies, but store it dry and in its protective packaging.
When to Call a Pro or Replace
Stop the job and seek professional service if the plug is seized, the threads are damaged, the plug broke during removal, or the cylinder head appears cracked. A repair shop may be able to restore damaged threads with a proper insert, but forcing a plug can turn a small maintenance task into an engine repair.
If a new, correctly gapped plug does not solve hard starting or rough running, the problem may involve stale fuel, a clogged carburetor, a dirty air filter, low compression, an ignition coil, or a governor fault. Consider replacing the generator rather than repairing it when the engine has severe compression loss, major oil consumption, repeated head-thread damage, or repair costs approaching the price of a comparable new unit. Check the generator’s rated and starting wattage before choosing a replacement; a new unit should comfortably exceed the combined running demand of the appliances you intend to power.
FAQ
Do I need to disconnect the battery to change a generator spark plug?
Not always, but disconnecting the negative battery cable on an electric-start model adds protection against accidental cranking. Follow the manual, and keep the ignition switch off while servicing the plug.
Can I use any spark plug with the same thread size?
No. Thread size is only one specification. The plug must also have the correct reach, heat range, electrode design, terminal, gasket style, and gap. Using the wrong plug can cause poor performance or internal engine damage.
Why does my generator still not start after replacing the plug?
Check that the boot is fully seated, the engine switch and fuel valve are in the correct positions, and fresh fuel is available. If the plug is wet, the engine may be flooded. If it is dry but there is no spark, the ignition system, safety switch, or coil may need diagnosis.
Should I replace the spark plug if it looks clean?
Not necessarily, but appearance is not the only test. Check the plug’s gap, electrode wear, ceramic condition, and service interval. Replace it if the manual calls for replacement or if starting and running symptoms persist.



Write Your Review
No reviews yet. Be the first to share your experience!